How to Integrate CloudValid into Your Application
A simple usage of CloudValid is designed to be setup in a few minutes. You can create an account for free and test it out, here.
- The easiest (and possible No-Code) way to get setup with CloudValid is to follow the Setup Wizard, which you’ll see the first time you signup to CloudValid, here.
- For interactive API docs and response codes, check out our Swagger Docs.
Note: If you want to interact with CloudValid via our Developer API, you'll need your valid API key, which you can retrieve by navigating to the API Keys section (here) within your account dashboard.
Step 1. Configure Your App’s DNS Use Cases
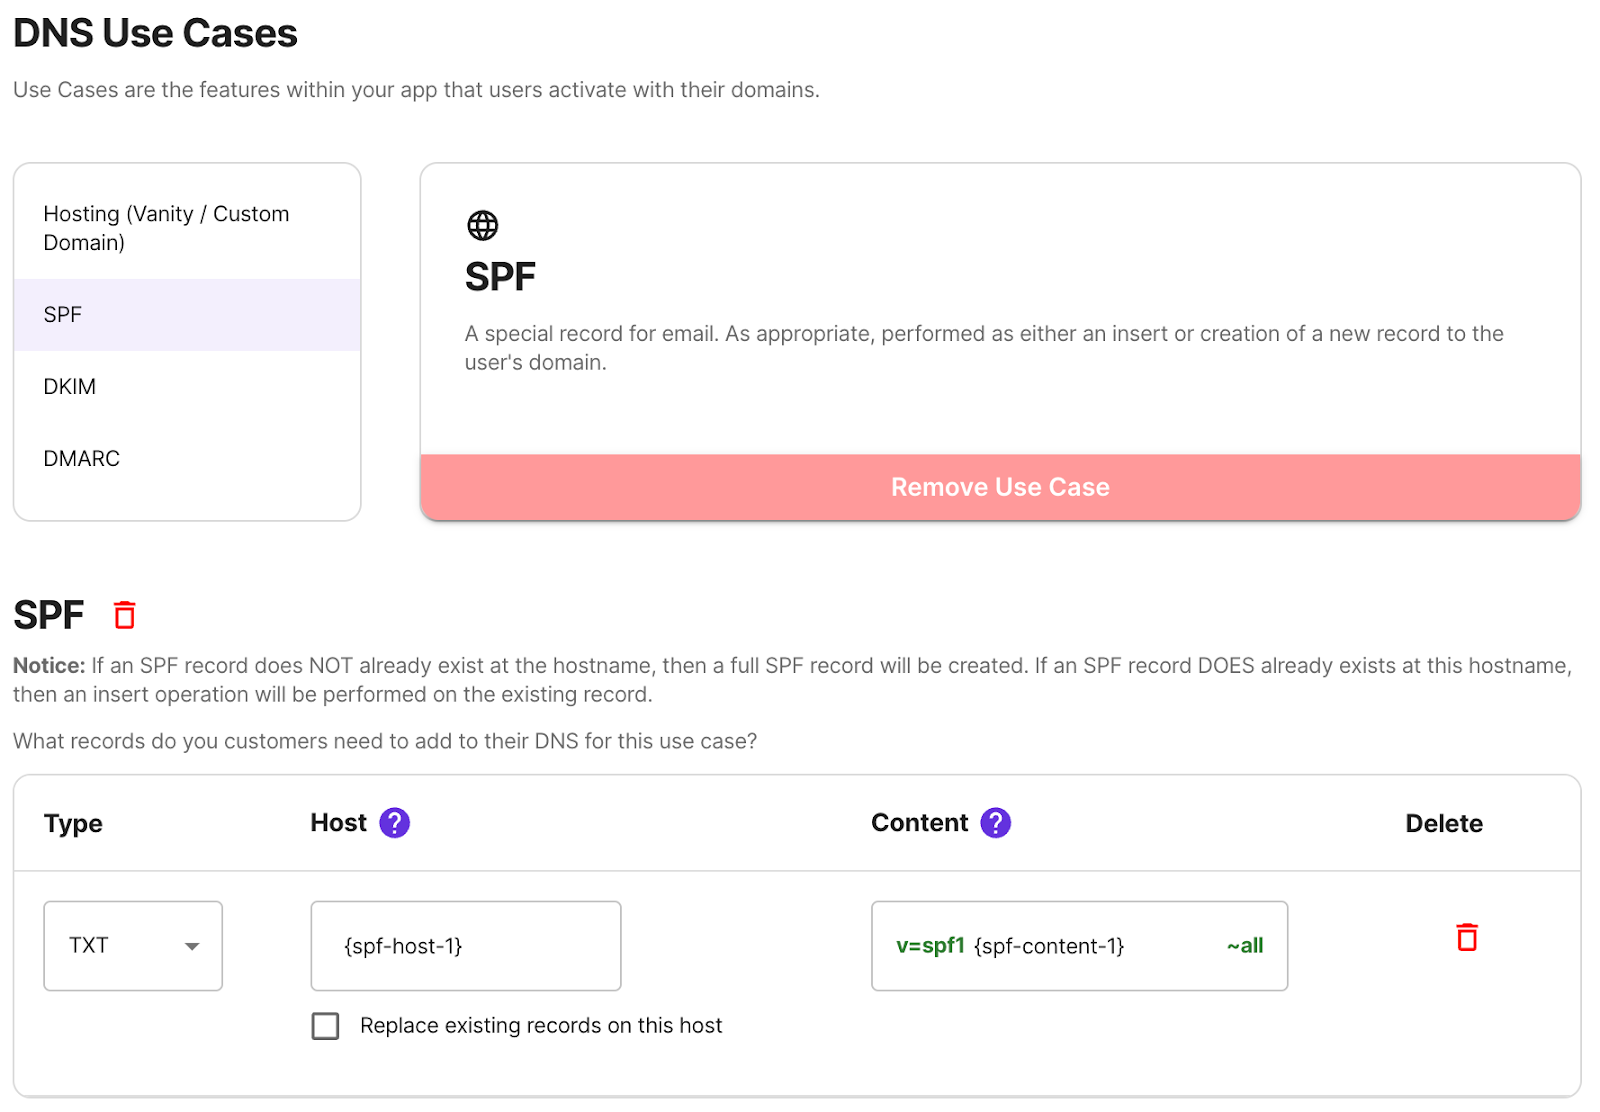
After you’ve signed up and created your account here, your first task is setting up your app’s DNS Use Cases here. These are the templated DNS changes that you will be asking the users of your app to be making. Your templated Use Cases can contain a combination of static and/or variable parameters, using {braces} to indicate your variables.
Default variable parameters are provided when a Use Case is selected, which you can keep, replace with your variable name of your choice, or replace with a static parameter.
Both Static and Variable Parameters have their own advantages when used in for your app’s templated Use Cases:
- Static: Allows for a simple No-Code setup and usage within your application.
- Variable: Allows you to personalize the hostname for each DNS record that you setup with your users, providing your application with the flexibility to segment, group, or isolate users to different DNS resources.
For example, if your app requires users to setup SPF, you’ll select the SPF Use Case that looks like the following:
Step 2. (Optional) Configure Your Branded DNS Service Name
A DNS Service Name is the target resource that your app asks your users to point their hostnames towards. Conventionally these are DNS records that you host, such as static TXT records (such as for domain verification, SPF, DKIM, etc), A records (such as for web hosting), or CNAME records. They typically look something like this.
| USE CASE | HOST | TYPE | SERVICE NAME / DATA |
|---|---|---|---|
| SPF | customer.com | TXT | v=spf1 {ip-range} ~all |
| SPF | subdomain.customer.com | CNAME | spf.your-app.com |
| WEB HOSTING | customer.com | A | {ip-address, e.g. 1.2.3.4} |
| WEB HOSTING | www.customer.com | CNAME | cdn.your-app.com |
By default, DNS Service Names within CloudValid are conveniently hosted by us, using branded subdomains of SVCB.io. They can look something like this:
| USE CASE | HOST | TYPE | SERVICE NAME / DATA |
|---|---|---|---|
| SPF | subdomain.customer.com | TXT | v=spf1 include:spf.your-app.svcb.io ~all |
| DKIM | selector._domainkey.customer.com | CNAME | selector.dkim.your-app.svcb.io |
| WEB HOSTING | www.customer.com | CNAME | cdn.your-app.svcb.io |
When using our default Branded DNS Service Names, each DNS record that you generate for each of your users is a unique DNS resource, allowing you to programmatically update any individual DNS record for any customer at any time.
Pro Plan and higher can continue to use their own root domain, called Custom Service Domains, and continue to self-host the DATA / TARGET, or delegate a subdomain branch of your root domain to CloudValid (via NS records) to take advantage of CloudValid’s ability to create, host, and programmatically manage unique DNS records for each of your users.
| USE CASE | HOST | TYPE | SERVICE NAME / DATA |
|---|---|---|---|
| WEB HOSTING | customer.com | A | {your-ip-address} |
| WEB HOSTING | www.customer.com | CNAME | cdn.your-app.com |
| WEB HOSTING | www.customer.com | CNAME | {cloudvalid-hostname}.your-app.com |
Step 3. (Optional) Preview UI and Branding
After setting up your Use Cases and (optionally) setup your Branded DNS Service Name, you have the additional option to adjust the visual style and branding of the core CloudValid component that your users will interact with, which is a personalized Guided DNS Setup Workflow for each of your user’s domains.
You might choose to present this Guided DNS Setup Workflow to your users as an embedded component within your app, such as within your app’s domain settings page, or as a unique Shareable Hosted Link that your users can navigate to and share with their team responsible for DNS.
Pro Plan and higher can fully whitelabel this component, removing CloudValid branding and even setting a custom domain for the Shareable Hosted Link.
Step 4a. Prompt User for their Domain
A current limitation of CloudValid is that you must design a UI component that can prompt your users for the domain that they want to configure for your app’s DNS Use Cases. You’ll pass this domain along to the next step, your user’s personalized Guided DNS Setup Workflow.
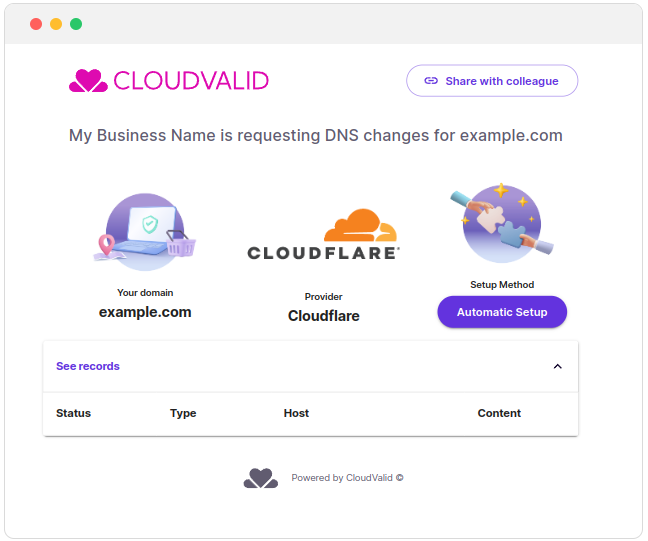
Step 4b. Present Your Personalized Guided DNS Setup Workflow
Having prompted your user for their domain in the previous step, you can present them with CloudValid’s Guided DNS Setup Workflow. You can presented this to users in two ways:
- Option 1: Unique Shareable Hosted Links
- Option 2: Embedded Component within your App
Both options display the same content, a Personalized Guided DNS Setup Workflow, which looks something like this:
Option 1: Shareable Hosted Link
This is a core product that CloudValid provides for your app. Each Shareable Hosted Link is a unique, publicly accessible URL, designed for your user to self-serve, if they’re able, or to share with their team. It’s common for the first user presented with your app’s DNS Setup Task to be non-technical, and the Shareable Hosted Link allows a non-technical user to hand off this task to the appropriate team within their organization who is responsible for managing DNS.
You can generate Shareable Hosted Links in either manually or programmatically. Shareable Hosted Links looks something like this: https://app.cloudvalid.com/config/18a9bb25-6ec6-4a9e-83d2-226a4c192aff
Manually Generate Shareable Hosted Link
Within your Admin Portal, generate Shareable Hosted Links using the “Create New” button within the Configuration Links page, here
Programmatically Generate Shareable Hosted Link
Here’s an example API call:
 curl -X 'POST' 'https://api.cloudvalid.com/api/v1/dns-setup?api_key=<your_api_key>' \
      -H 'accept: */*' \
      -H 'Content-Type: application/json' \
      -d '{
            domain: "mycustomerdomain.com",
            variables: {
              "variable-name-1": "spf.myproduct.com"
            }
          }'
Option 2: Embedded Component
The same content within the Shareable Hosted Link can also be embedded into your app using an iframe, so that your user can follow the Guided DNS Setup Workflow as a native experience within your app. Example iframe Iframe code example, containing the local callback with updates:
<iframe src="https://app.cloudvalid.com/config/<your_client_id>:example.com"
                                            style="width: 100%; height: 100%; border: none;"></iframe>
<script>
  window.addEventListener("message", function(event) {
    console.log(event);
    if (event.data.type === "cloudvalid-iframe-message") {
      // Do something here
      if (event.data.status === "propagated") {
        console.log("The records are successfully propagated!");
      }
      if (event.data.status === "waiting-propagation") {
        console.log("The customer has setup the records using automation, we're waiting for the propagation.");
      }
    if (event.data.status === "not-propagated") {
        console.log("The customer has the page open, but the records are not propagated.");
    }
    }
  });
</script>
Guided DNS Setup Workflow
The Guided DNS Setup Workflow is a core CloudValid product. It provides a streamlined user experience for your users to setup DNS as directed by your app. We detect the Domain Management System responsible for your the domain supplied by your user, and present your user with the choice of automated or manual setup options. CloudValid will continuously check your user’s domain for the DNS propagation of your app’s DNS Use Cases. Automated setup, including propagation, typically takes a few seconds.
(optional) Status Notification for DNS Propagation and Bounce
In the menu you can find a "Developers" -> "Settings" item, where you can set up a webhook endpoint to receive status notifications for DNS propagation and bounce. The status notifications are sent as POST requests to the specified URL. You can test them in real-time by clicking the "Send Test" button.
This is a significant status that you can ingest for detecting user churn. It means a lot if a user changes DNS, and is a useful signal that a user of yours has moved on.
Conclusion and Next Steps
A simple usage of CloudValid can be setup in a few minutes. You can create an account for free and test it out. For interactive docs and response codes, check out our Swagger Docs.